User Guide
Table of Contents
- Introduction
- Essential Terms & Symbols
- Quick Start
-
Commands
- Command Summary
- Adding an internship
- Deleting an internship
- Listing all internships
- Editing an internship
- Adding a remark
- Finding internships by keywords
- Sorting internships by fields
- Add a Task to an Internship
- Set Deadline to a Task
- Deleting Tasks from an Internship
- Clearing all internships
- Exiting the program
- Viewing help
- Miscellaneous
Introduction
Welcome to CareerSync’s User Guide!
CareerSync is an internship application manager designed to simplify the management of internship applications. We’re here to help
you keep track of your internships, so you can focus on preparing for your interviews and securing your dream internship! ![]()
Who is CareerSync for?
CareerSync is tailored to NUS Computing students with experience in command line interfaces (CLI).
Our app is driven by command inputs through the CLI, making it faster than conventional GUI-based applications.
If you are a beginner, don’t worry! Our Quick Start section will guide you through the installation of all the necessary tools, even if you have never used a CLI before.
What is the purpose of this User Guide?
This user guide was created to help students starting out with CareerSync get started with using our application quickly!
For first-time users, we recommend starting at the Quick Start section to install CareerSync, before heading to the Tutorial section.
For experienced users, check out the Commands section for a quick reference.
Do check out our FAQ, Known Issues and Glossary sections for more information!
What can students do with CareerSync?
As computing students, keeping track of all the internship applications we’ve made tends to be a hassle.
With CareerSync, you can:
- Add internships, along with details such as company name, description, status and more!
- Find internships by keywords, making it easy to find the information you need.
-
Manage tasks for your applications and keep track of their individual deadlines.
And so much more!
Essential Terms & Symbols
This section explains the common terms that you may not be familiar with, and the symbols used in this User Guide. Read through this section first so that you understand the contents of this User Guide.
Glossary
Legend
This User Guide contains coloured blocks that highlight important information!
Quick Start
Installation
- Ensure that you have Java 11 or above installed on your computer if you are using Windows.
- If you are using MacOS, follow the instructions here instead.
- Download the latest
CareerSync.jarfile here. - Make sure your jar file is located in an empty folder.
- Start CareerSync.
- For MacOS:
- Open up your Terminal by typing Command + Space, then type
Terminaland Enter.
- Navigate to the folder containing your jar file using
cd. If you are not sure how to usecd, refer to this link!
- Enter
java -jar CareerSync.jarand type Enter.
- Open up your Terminal by typing Command + Space, then type
- For Windows:
- Open the folder containing
CareerSync.jar. - Double-click on
CareerSync.jarto start up our application!
- Open the folder containing
- For MacOS:
- The Graphical User Interface similar to the image below should pop up on your screen.
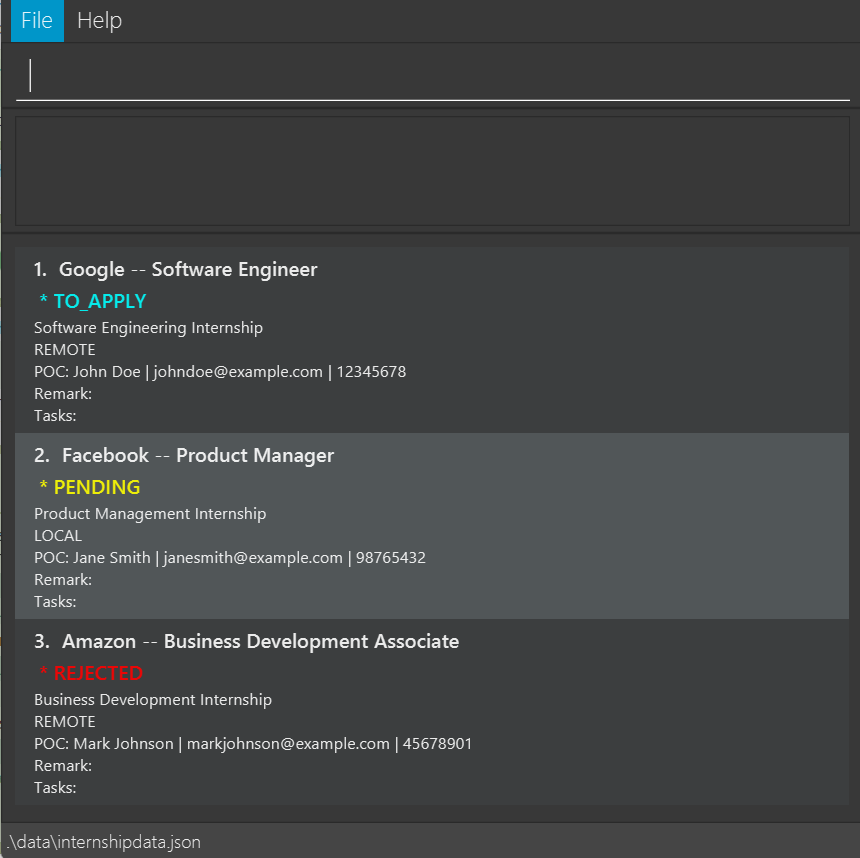
For more information on the interface, please refer to the Navigating CareerSync section.
Navigating CareerSync
When you first start CareerSync, you will see this window. This is the main window of CareerSync, where you can view all your internship applications.
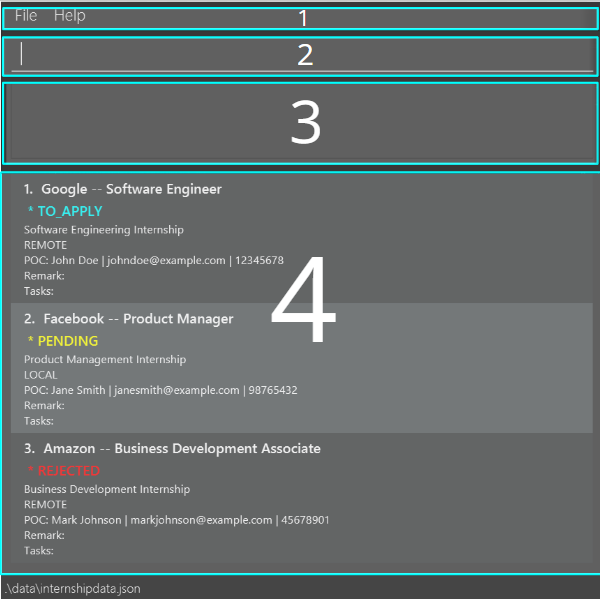
Areas
The main window of CareerSync is divided into four main areas: the Tab Area, the CLI, the Message Box and the Internship List Display.
- Tab Area: The Tab Area contains File and Help, which allows you to navigate its respective functions.
- CLI: The Command Line Interface (CLI) is where you can input commands to interact with CareerSync.
- Message Box: The Message Box displays messages to provide feedback to you.
- Internship List Display: The Internship List Display displays the details of all your internship applications.
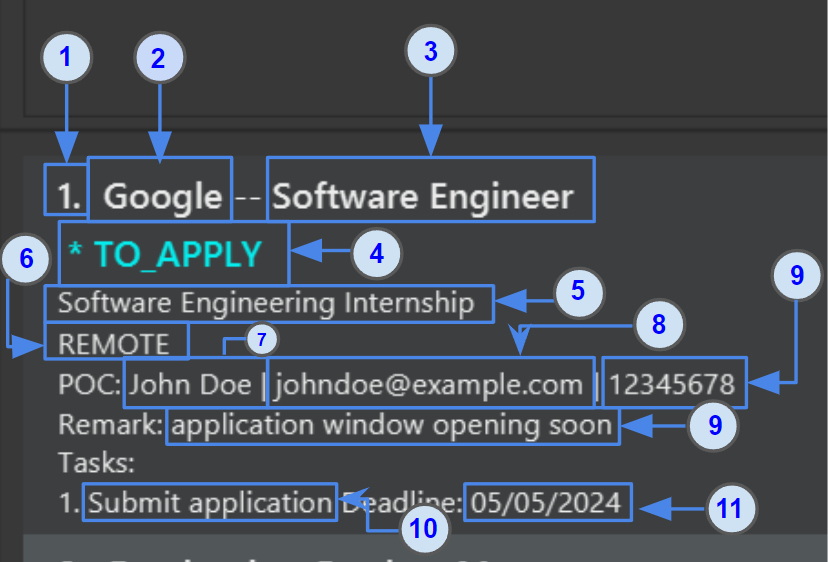
Internship Fields
The names of the fields for each internship application is as stated below. When you edit these fields, you will see the changes reflected in the display. For the restrictions on what is accepted for each field, kindly refer to Fields Summary.
-
INDEX- The number indicating the position of the internship application in the displayed list.
For example, the first internship in the list will have index 1. -
COMPANY_NAME- The name of the company you are applying to. -
ROLE- The role you are applying for. -
STATUS- The status of your application. -
DESCRIPTION- A brief description of the internship. -
LOCATION- The location of the internship. -
CONTACT_NAME- The name of the contact person. -
CONTACT_EMAIL- The email of the contact person. -
CONTACT_NUMBER- The phone number of the contact person. -
TASK- The description of the task. -
DEADLINE- The deadline of the task.
Detailed View Window
When you click on an internship entry in the internship list, a separate window will be open showing
the detailed view of the internship entry.
This view will show all the fields of the internship entry in a bigger font size for easier reading.
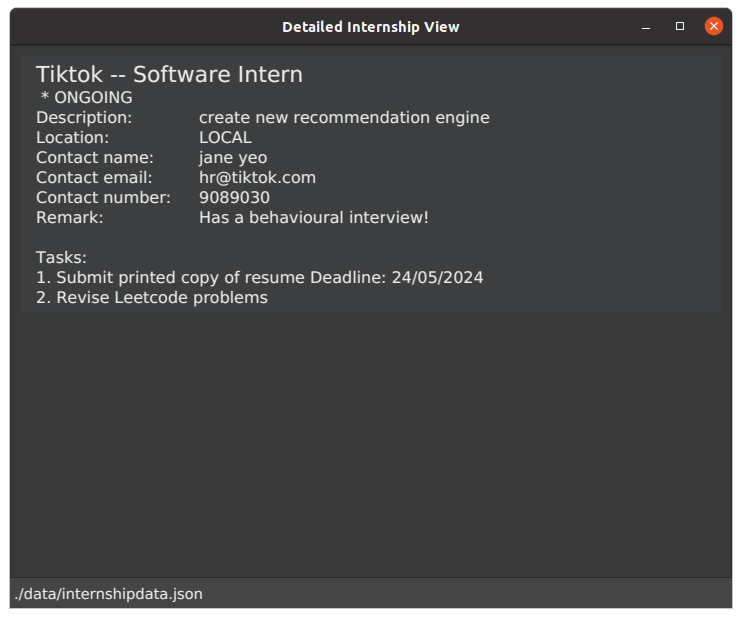
CLI input to access Detailed View will be implemented in a future release.
Tutorial
This section would guide you through the basic commands of CareerSync, and how to use them. Please go through the tutorial and follow our step-by-step instructions so that you can better understand our application! Screenshots are included for your reference.
1. Clear sample internship entries: clear
To begin using CareerSync, you should clear the sample internship entries that are present when you first start the application.
Key in the command clear in the CLI and press Enter to clear the sample internship entries.
1. Input:
clear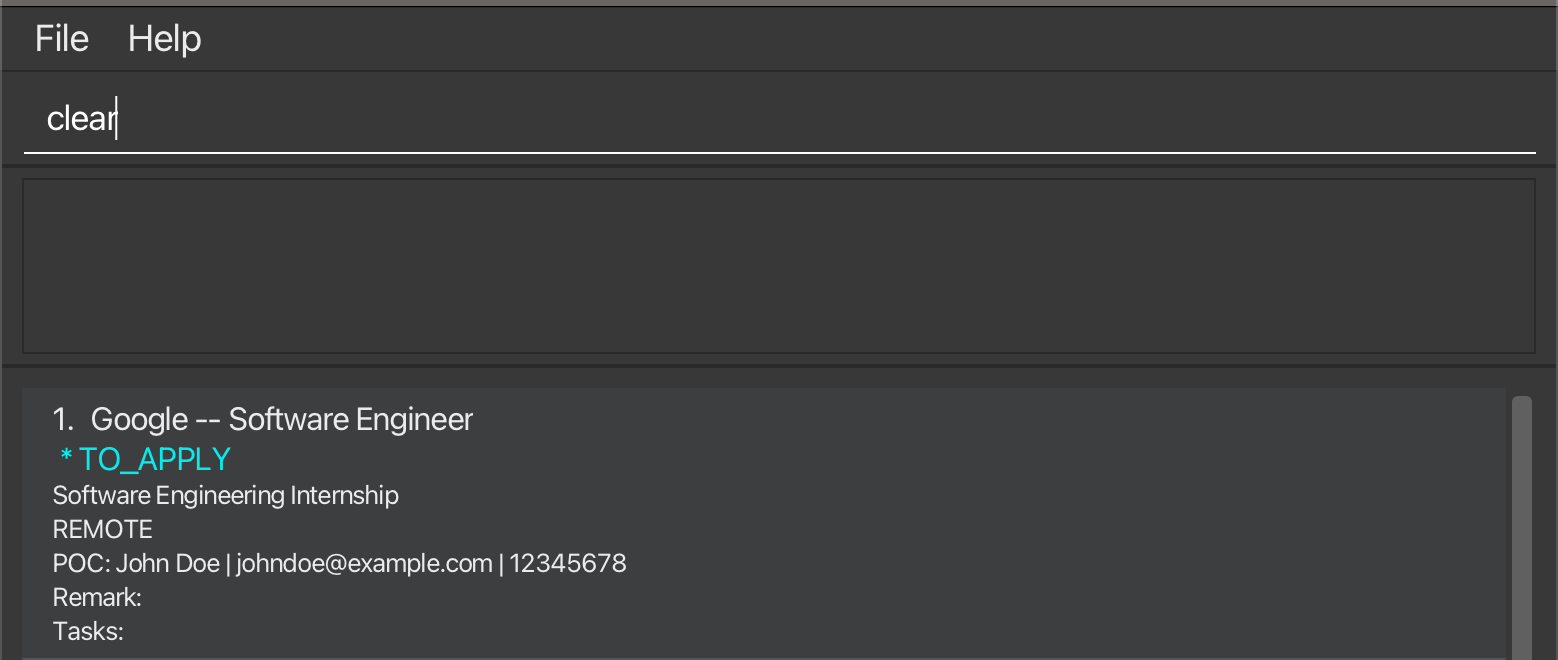

There are no more internships in the list.
2. Add an internship entry: add
Next, let us try to add an internship entry.
Key in the following command in the CLI:
add /com Tiktok /desc create new recommendation engine /status ongoing /poc jane yeo /emailhr@tiktok.com /phone 90890301 /loc remote /role Software InternSuccessful output after adding the entry:
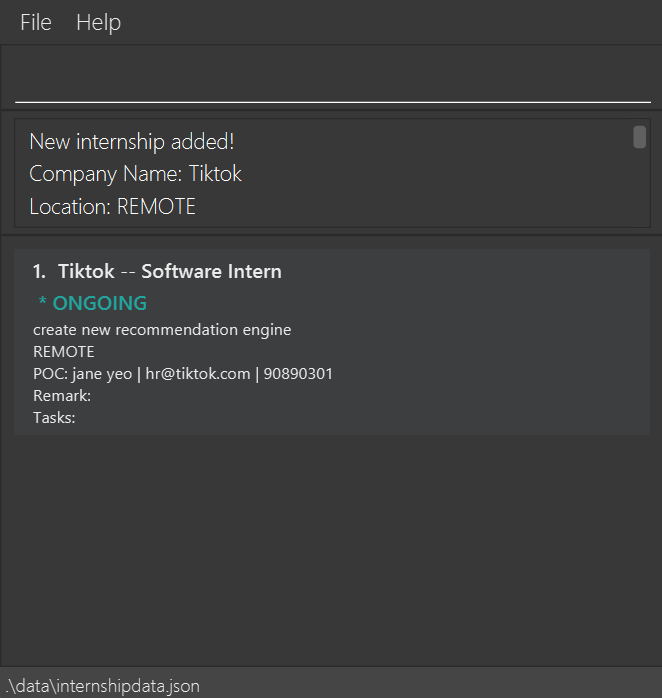
You can now see your new internship with the details you entered in the Internship List Display!
3. Edit an internship entry: edit
Oh no! You made a mistake in the email address of the contact person. Let’s edit the email address.
Key in the following command in the CLI:
edit 1 /email janeyeo@gmail.comSuccessful output after editing the entry:
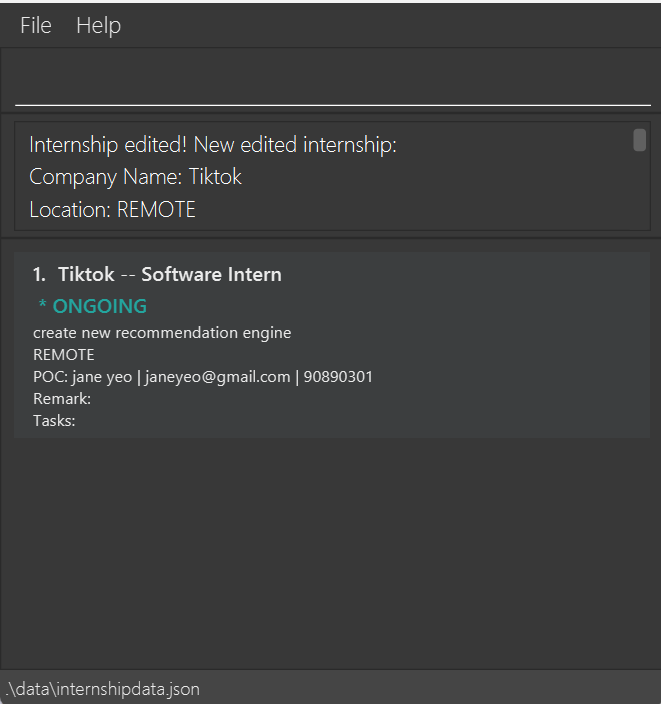
Your internship now has the updated email that you keyed in.
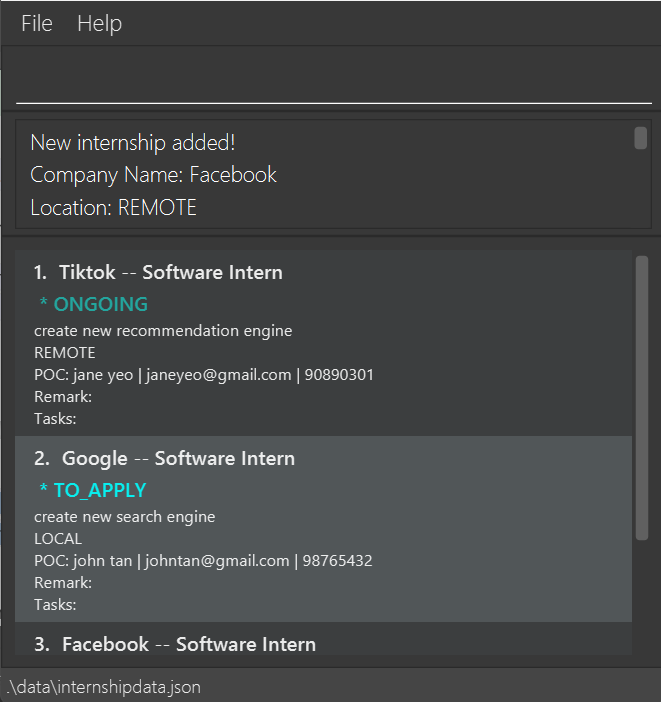
4. Find internship entries: find
Before you continue, add a few more internship entries using these commands:
-
add /com Google /desc create new search engine /status to_apply /pocjohn tan /email johntan@gmail.com /phone 98765432 /loc local/role Software Intern -
add /com Facebook /desc create new social media platform /status to_apply /pocjane tan /email facebookhr@gmail.com /phone 87654321 /loc remote /roleSoftware Intern
Successful output after adding the entries:
Let’s say you want to find all internships that you want to apply for, that give you a software intern role.
find is the command you need!
Key in the following command in the CLI:
find withall /status to_apply /roleSoftware InternSuccessful output after finding all entries that satisfy the conditions:
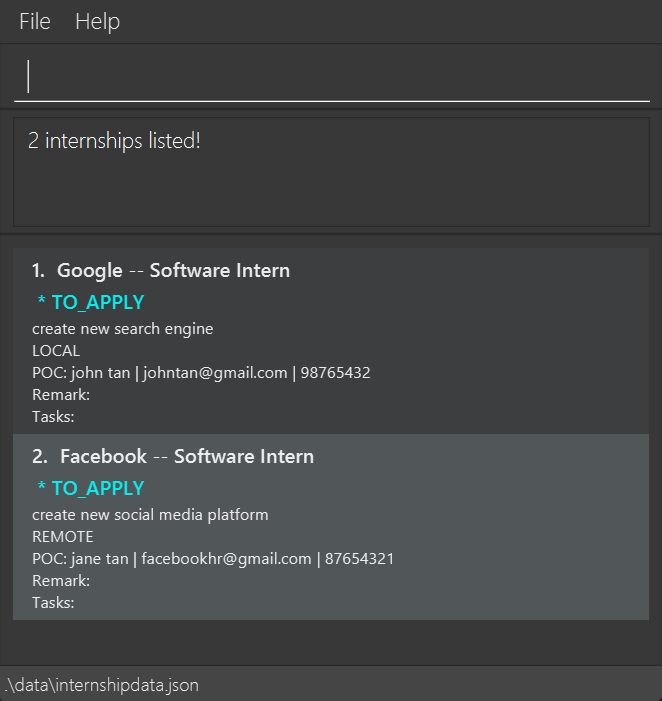
Your Internship List Display now only has all the internships satisfying both conditions.
5. Delete an internship entry: delete
You decide that to no longer pursue the internship at Facebook. Let’s delete that entry.
Key in the following command in the CLI:
delete 2Successful output after deleting the entry:
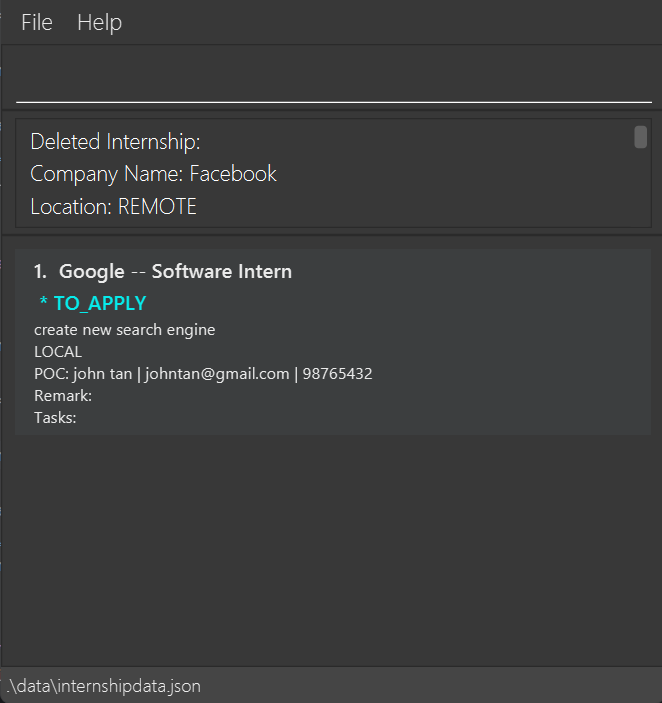
The Facebook internship entry has been removed, and is no longer present in your database.
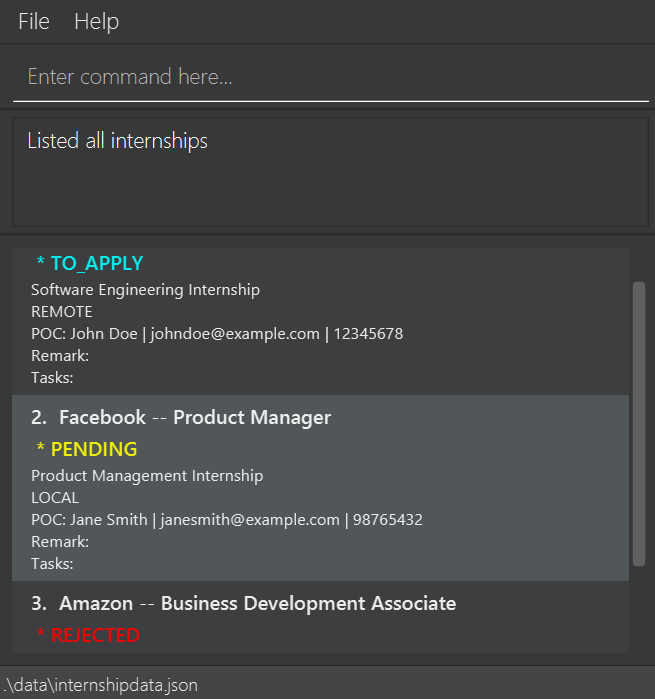
6. List all internships: list
You used find to filter the internships. How do you see all the internships again?
Key in the following command in the CLI:
listSuccessful output after listing:
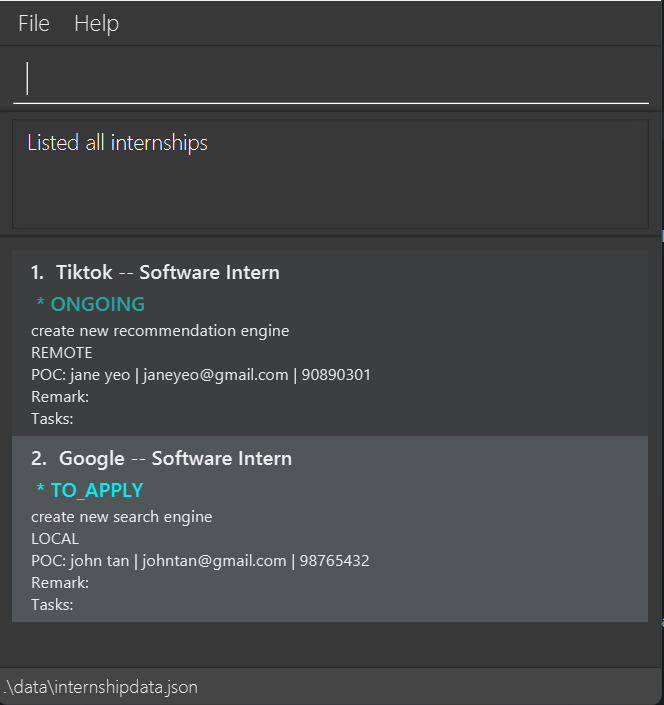
You now see all your internships. Your Tiktok internship, previously hidden, is now back in view.
7. Exit the program: exit
You decide that you are done for the day. How do you exit the application and save the file?
Key in the following command in the CLI:
exitUpon reopening the app:
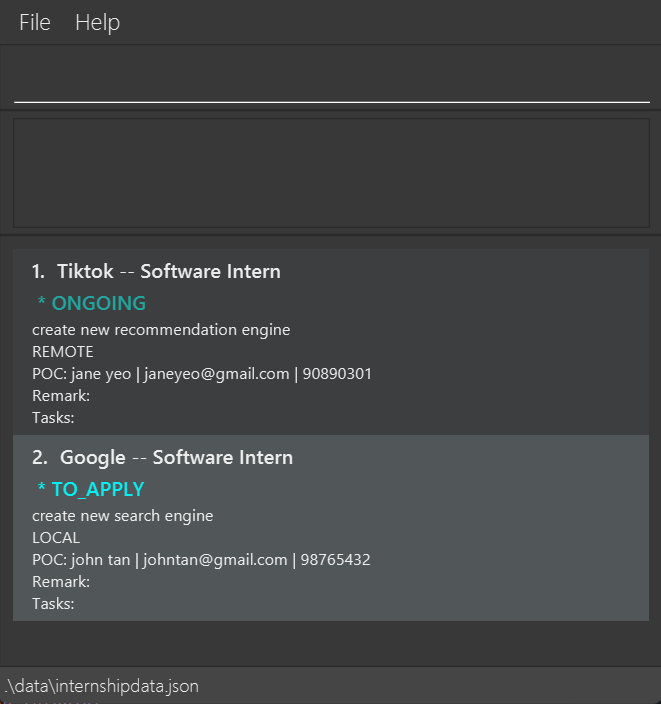
You now see all your internships that you have when you exited. Your data was saved!
What Makes An Internship Unique?
Understanding what makes an internship unique will help you avoid duplicate internship errors when creating internship entries!
The following fields are what make an internship unique:
Company Name
Contact Name
Contact Email
Contact Number
Description
Application Status
Simply, an internship entry is considered a duplicate, if all of the above fields for the current internship entry are the same as an already existing internship entry!
Wrapping up the tutorial
This wraps up our tutorial! Hope you now have a better understanding of how to use CareerSync to manage your internship applications now.
Only simple and common use cases are covered in this tutorial. Please refer to the Commands section so that you fully understand each command and their usage.
Commands
In this Commands section, you’ll find a comprehensive overview of all the actions you can perform within the application! Whether you’re adding details about a company or searching for specific entries, this section has got you covered with clear descriptions and easy-to-follow formats.
Command Summary
| Action | Description | Format |
|---|---|---|
| add | Adds an internship. | add /com COMPANY_NAME /desc DESCRIPTION /status STATUS /poc CONTACT_NAME /email CONTACT_EMAIL /phone CONTACT_NUMBER [/loc LOCATION_ENUM] [/role ROLE] |
| delete | Removes a internship. | delete INDEX |
| list | Lists all internships. | list |
| edit | Modifies an existing internship. | edit INDEX [/com COMPANY_NAME] [/poc CONTACT_NAME] [/email CONTACT_EMAIL] [/phone CONTACT_NUMBER] [/loc LOCATION_ENUM] [/status STATUS] [/desc DESCRIPTION] [/role ROLE] [/remark REMARK] |
| addremark | Adds a remark to an existing internship. | addremark INDEX /remark REMARK |
| find | Finds an internship by keywords. | find MODE [/com COMPANY_NAME_KEYWORDS] [/poc CONTACT_NAME_KEYWORDS] [/loc LOCATION_KEYWORDS] [/status STATUS_KEYWORDS] [/desc DESCRIPTION_KEYWORDS] [/role ROLE_KEYWORDS] [/remark REMARK_KEYWORDS] |
| sort | Sorts the internships by fields. | sort FIELD ORDER |
| addtask | Adds a task to an internship. | addtask INDEX /task TASK |
| setdeadline | Sets a deadline to a task. | setdeadline INDEX_INTERNSHIP /selecttask INDEX_TASK /deadline DEADLINE |
| deletetask | Deletes a task from an internship. | deletetask INDEX_INTERNSHIP /selecttask INDEX_TASK |
| clear | Removes all internships from the app. | clear |
| exit | Exits and closes the application. | exit |
| help | Get access to the help page | help |
Notes about the command format
-
INDEXrefers to the index of the internship in the list. It must be a positive integer (like 1, 2, 3 …) and one of the displayed internship indexes. -
Items in square brackets are optional.
e.g/com COMPANY_NAME [/desc DESCRIPTION]can be used as/com Alibaba /desc Free shipping for employeesor as/com Alibaba. -
Parameters can be in any order.
e.g. if the command specifies/com COMPANY_NAME /desc DESCRIPTION,/desc DESCRIPTION /com COMPANY_NAMEis also acceptable.
Adding an internship: add
Lets you add an internship entry to be tracked by CareerSync!
Format: add /com COMPANY_NAME /desc DESCRIPTION /status STATUS /poc CONTACT_NAME /email CONTACT_EMAIL /phone CONTACT_NUMBER [/loc LOCATION_ENUM] [/role ROLE]
- The fields
COMPANY_NAME,DESCRIPTION,CONTACT_NAMEallow the use of any text, number and/or spaces - The field
STATUSaccepts only the following inputs:to_apply,ongoing,rejected,accepted(case-insensitive) - The field
CONTACT_EMAILaccepts only the format of<email>@<domain> - The field
CONTACT_NUMBERmust be unsigned, and it must be at least 7 digits long - The field
LOCATION_ENUMaccepts only the following inputs:unknown,remote,local,overseas(case-insensitive)- Do note that should you leave the location field empty, it will default to
unknown
- Do note that should you leave the location field empty, it will default to
- The field
ROLEallow the use of any ASCII characters (excluding!and?)
1. If you miss out any of the mandatory fields, the command will be rejected with an error message. Make sure to refer to the error message displayed for the correct format to use!
2. If you input an invalid status, location or email format, the command will be rejected with an error message highlighting the valid values.
3. When using the
add command, the /phone parameter does not have a maximum limit for number of digits. Do manually ensure that the length of the phone number you input is correct. 4. If you encounter the
This internship already exists in the internship list message, please go here to learn about what makes an internship unique.
| Go to Field Summary | Go to Command Summary | Go to Table of Contents |
Deleting an internship: delete
Lets you delete an internship entry from CareerSync.
Format: delete INDEX
- Deletes the internship at the specified
INDEX. - The index refers to the index number shown in the displayed list of internship entries at point of deletion.
- The index must be a positive integer 1, 2, 3, …
1. If you input an index that is not one of the displayed internship indexes, the command will not be executed and an error message will be displayed.
| Go to Field Summary | Go to Command Summary | Go to Table of Contents |
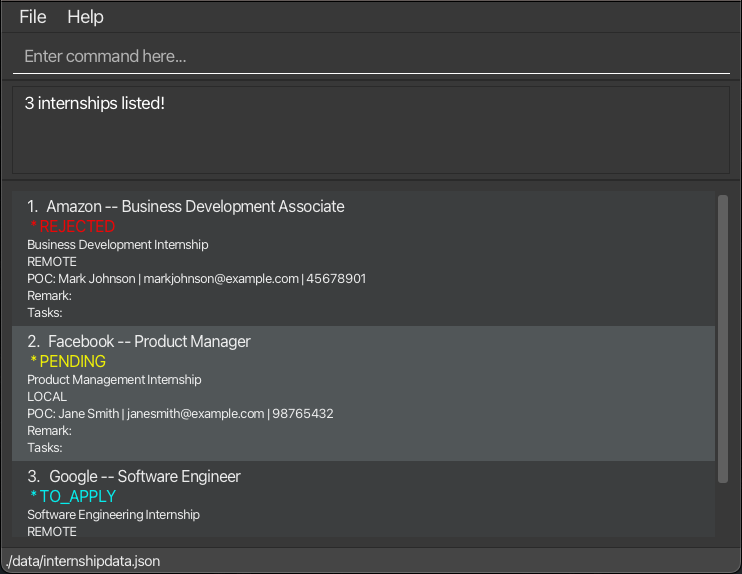
Listing all internships: list
Shows you a list of all your internships tracked by CareerSync.
Format: list
When you first start the application, you will see a list of all the internships you have added.
The find command might be used to filter the visible list of internships.
If you want to see all internships again, simply type
list and press enter.
1. Input:
list 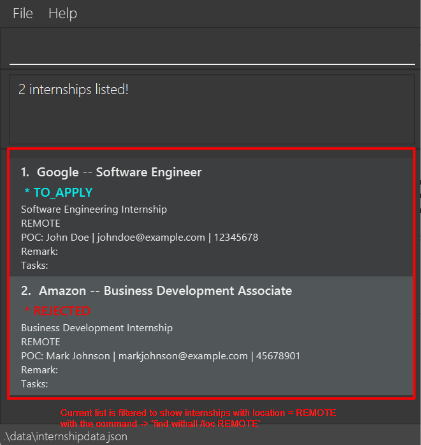
In this example, the current view shows only internships with location
REMOTE.
2. Successful Output after executing list:
Any present filter will be removed, and all internships will be displayed in the list.
list to see all your internships.
You may have had a filter applied that is hiding the internship you are looking for.
| Go to Field Summary | Go to Command Summary | Go to Table of Contents |
Viewing an internship entry’s details
When you click on an internship entry in the internship list, a separate window will be open showing
the detailed view of the internship entry.
This view will show all the fields of the internship entry in a bigger font size for easier reading.
CLI input to access Detailed View will be implemented in a future release.
| Go to Field Summary | Go to Command Summary | Go to Table of Contents |
Editing an internship: edit
Lets you edit an existing internship entry in CareerSync.
Format : edit INDEX [/com COMPANY_NAME] [/poc CONTACT_NAME] [/email CONTACT_EMAIL] [/phone CONTACT_NUMBER] [/loc LOCATION_ENUM] [/status STATUS] [/desc DESCRIPTION] [/role ROLE] [/remark REMARK] …
- Edits the internship at the specified
INDEX. The index refers to the index number shown in the displayed internship list. The index must be a positive integer 1, 2, 3, … - At least one of the optional fields must be provided.
- Multiple fields can be edited at once.
- Existing values will be updated to the input values.
- Only valid field values will be accepted. For example, you cannot set the status to ‘ghosted’ as it is not a valid status.
- To view the list of valid values for each field, refer to the Field Summary or Adding an internship
1. Input:
edit 1 /email google@gmail.com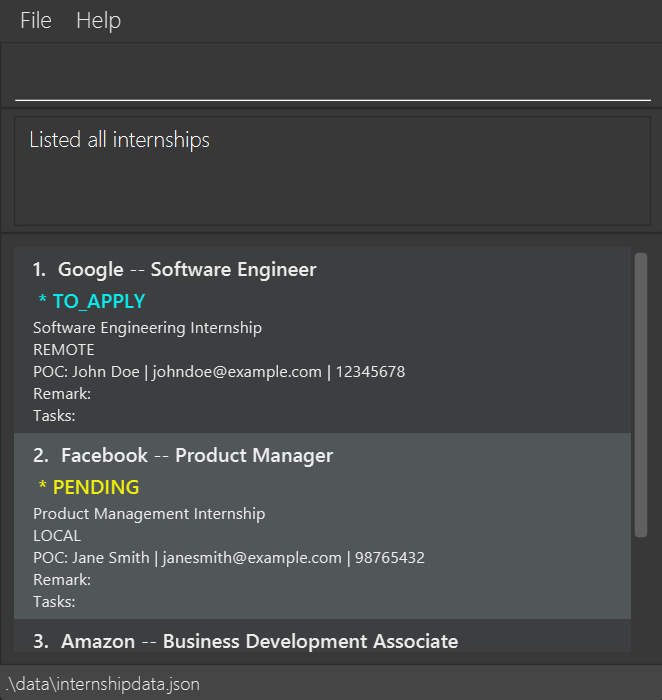
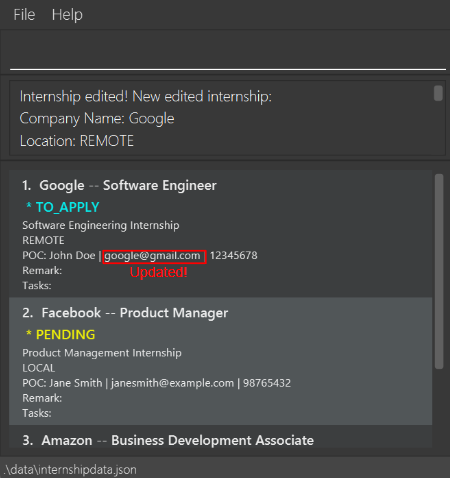
The email field of the first internship is successfully updated to
google@gmail.com.
edit INDEX /remark.
2. After using edit, the list will reset to show all internships. Be careful as the index of your internship may have changed!
1. Make sure not to miss out the mandatory
INDEX field. If you do, CareerSync won’t know which internship to edit! 2. If you encounter the
This internship already exists in the internship list message, please go here to learn about what makes an internship unique.
3. When using the edit command, the /phone parameter does not have a maximum limit for number of digits. Do manually ensure that the length of the phone number you input is correct. | Go to Field Summary | Go to Command Summary | Go to Table of Contents |
Adding a remark: addremark
You can use this to add a remark or modify an existing one, of the internship at the specified INDEX.
Use this to keep track of your personal notes about the internship!
Format: addremark INDEX /remark REMARK
-
INDEXrefers to the index in the internship list and must be a positive integer 1, 2, 3, …
addremark INDEX /remark.
1. Input:
addremark 1 /remark This internship has a behavioural interview!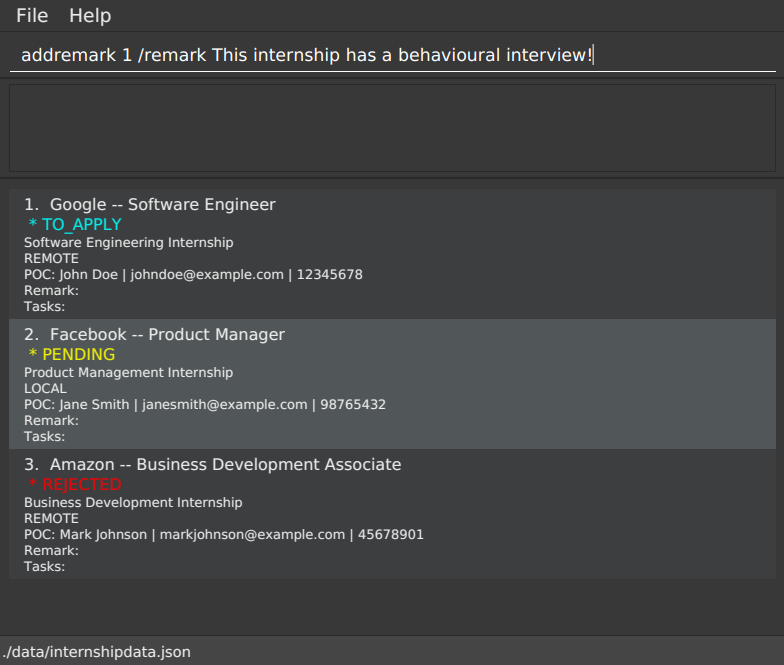
2. Successful Output after adding a remark:
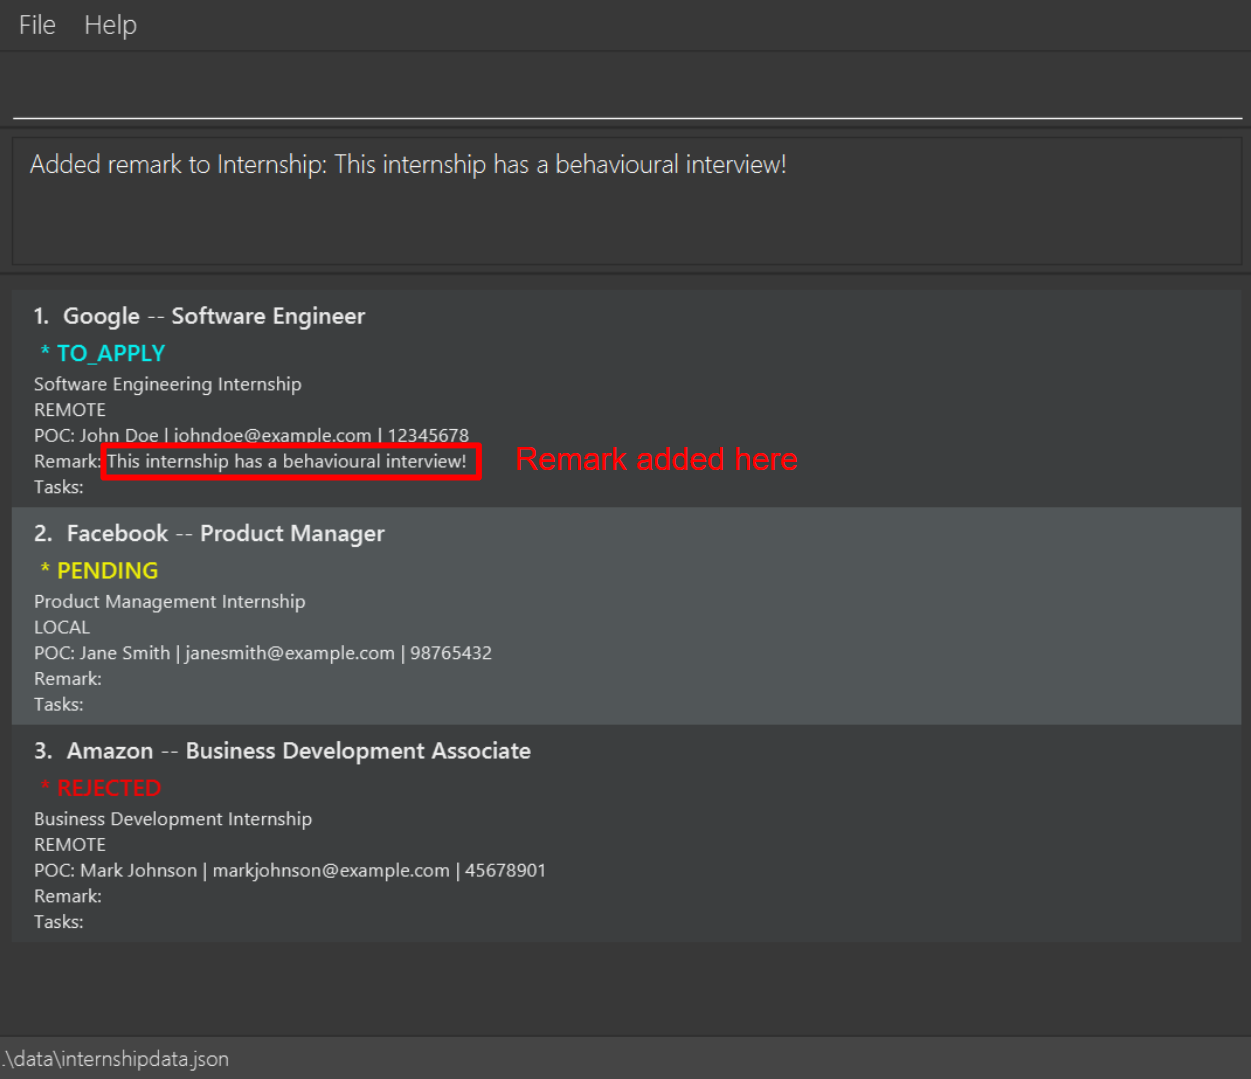
This sets the remark of the internship at index 1 to be
This internship has a behavioural interview!.
1. Don’t forget to have the
/remark prefix before the remark you want to add.
| Go to Field Summary | Go to Command Summary | Go to Table of Contents |
Finding internships by keywords: find
You can use this to filter what internships you see in CareerSync based on the keywords you provide.
Format: find MODE [/com COMPANY_NAME_KEYWORDS] [/poc CONTACT_NAME_KEYWORDS] [/loc LOCATION_KEYWORDS] [/status STATUS_KEYWORDS] [/desc DESCRIPTION_KEYWORDS] [/role ROLE_KEYWORDS] [/remark REMARK_KEYWORDS]
- MODE is either ‘withall’ or ‘withany’.
- ‘withall’ returns internships that match each prefix-keyword predicate.
- Within each prefix field that you specified, the internship just has to contain any of the keywords.
- ‘withany’ returns internships that match at least one prefix-keyword predicate.
- ‘withall’ returns internships that match each prefix-keyword predicate.
- The search is case-insensitive. e.g
googlewill matchGoogle - The order of the keywords does not matter. e.g.
Microsoft Googlewill matchGoogle Microsoft - Only full words will be matched e.g.
Goowill not matchGoogle - Internship matching at least one keyword will be returned (i.e.
ORsearch). e.g.Hewlett Songwill returnHewlett Packard,Song Fa
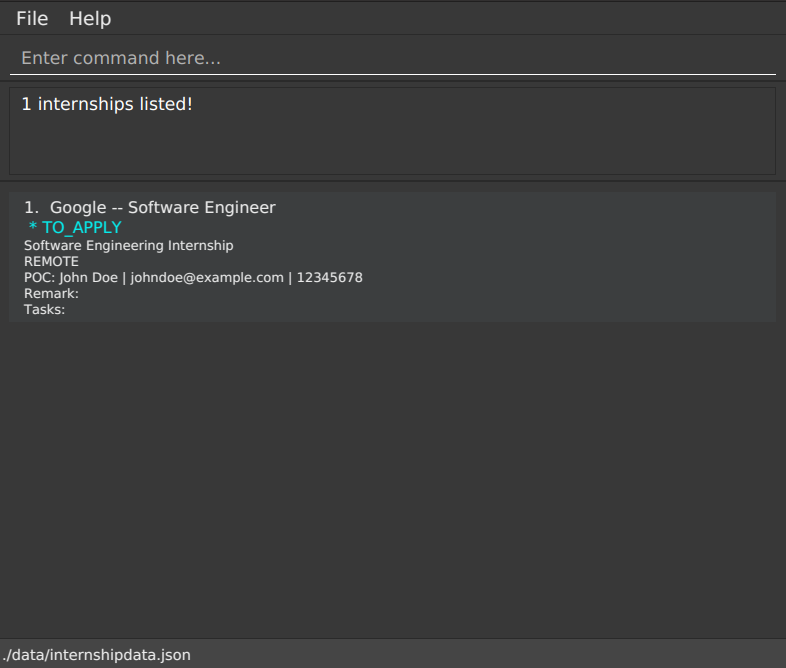
1. Input:
find withall /status to_apply /loc remote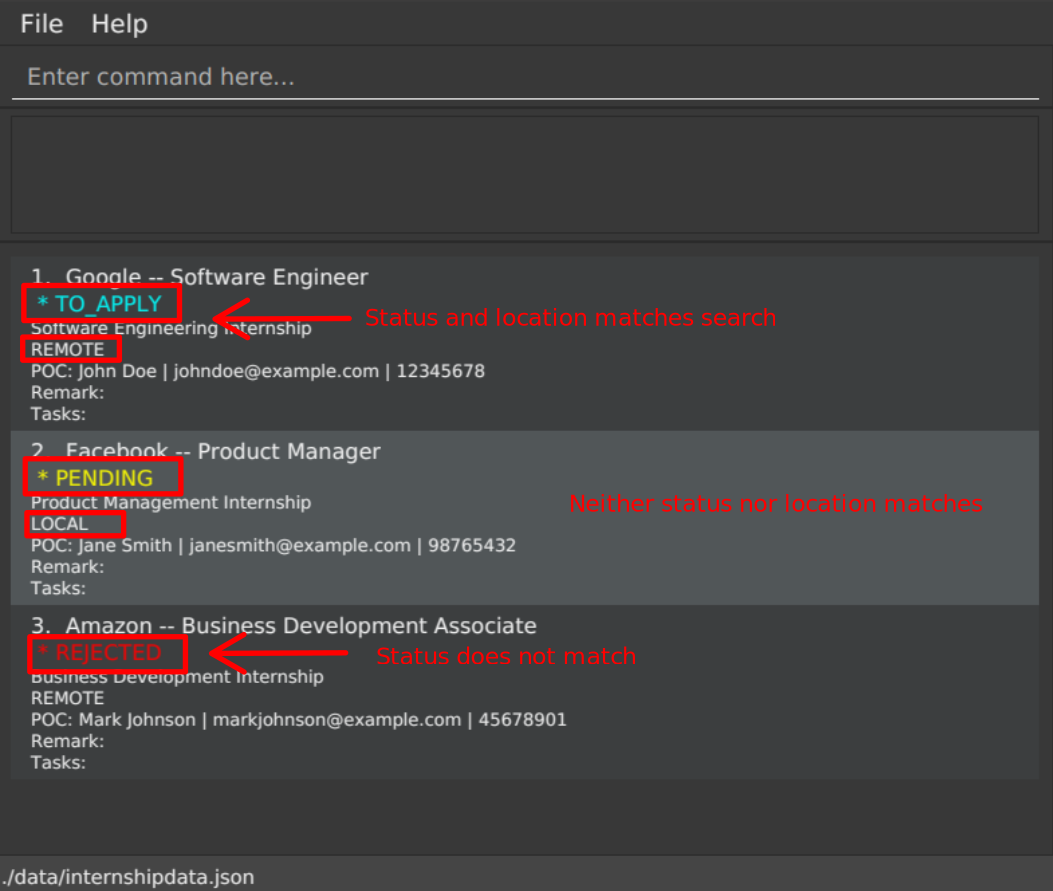
TO_APPLY and location REMOTE.2. Successful Output after filtering:
3. Other examples:
i.
find withany /com Google /loc local shows you internships with either company name (case-insensitive) Google or location LOCALii.
find withall /poc John /desc paperwork shows you internships with both contact name (case-insensitive) John and description containing paperwork
1. If you want to view all internships again, simply use the list command.
2. Upon executing commands, with the exception of
find, delete, sort, clear, help and exit, the filter will be removed i.e. the list will be reset to show all internships.
1. If you do not specify any field prefixes, or specified an invalid field prefix, the command will be rejected with error message:
At least one supported field prefix and keyword must be specified to be searched.
   Supported prefixes are /com, /poc, /loc, /status, /desc, /role, /remark
2. Make sure you specify the MODE of search, which must be either
withall or withany. If not, the command will be rejected with error message:Invalid mode specified. Please specify either 'withall' or 'withany'.3. Just to note, the unsupported fields in this version are
/phone, /email, /task, /selecttask and /deadline.Searching for these fields will result in an error message, highlighting the unsupported fields explicitly.
| Go to Field Summary | Go to Command Summary | Go to Table of Contents |
Sorting internships by fields: sort
This command allows you to sort the internships in CareerSync by the specified field in ascending or descending order.
Format: sort FIELD ORDER
- FIELD is the field to sort by. It is case-sensitive. The list of valid fields can be found here.
-
/statushas an implicit ordering, in ascending order:TO_APPLY->ONGOING->PENDING->ACCEPTED->REJECTED. - The rest of the fields are sorted in alphanumeric order. (A before Z, 0 before 9)
-
- ORDER is either
ascordesc.-
ascsorts the internships in ascending order. -
descsorts the internships in descending order.
-
1. Input:
sort /com asc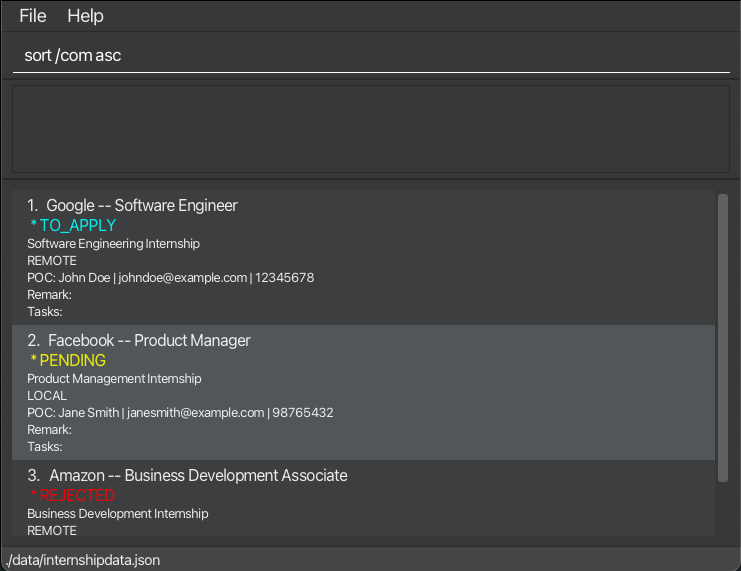
This will sort the list of internships by company name in ascending order.
3. Other examples:
i.
sort /status asc sorts your internships in the following order: TO_APPLY -> ONGOING -> PENDING -> ACCEPTED -> REJECTEDii.
sort /phone asc sorts your internships in ascending order of phone numbers.
1. Don’t forget to specify the ORDER of sorting, which must be either
asc or desc.
| Go to Field Summary | Go to Command Summary | Go to Table of Contents |
Add a Task to an Internship: addtask
Using this function, you can add a task to an internship so that you won’t forget to complete it!
Format: addtask INDEX /task TASK
-
INDEXis the internship index you want to add the task to. -
TASKis the task you want to add to the internship.
1. Input:
addtask 1 /task Edit Resume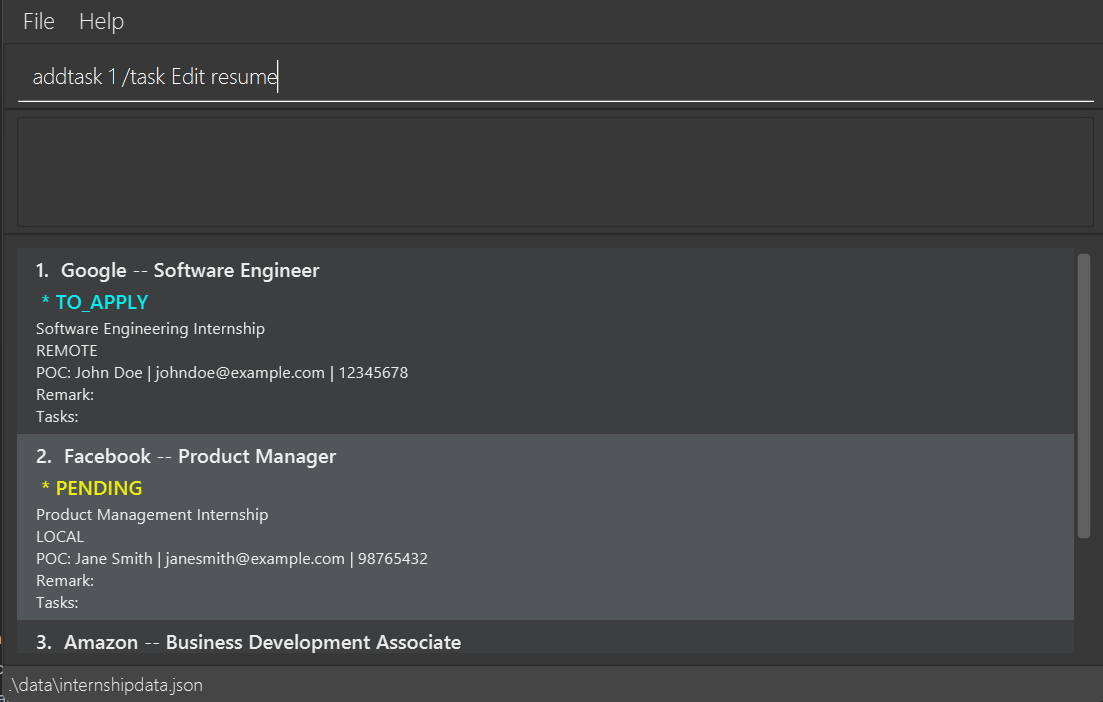
2. Successful Output after adding a task:
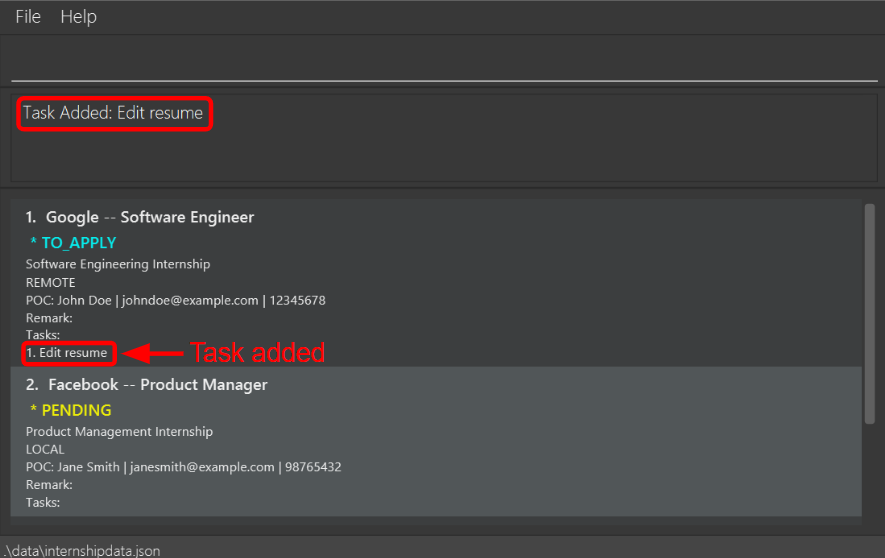
add command. You must use the addtask command to add a task to an internship.
1. The index must be a positive integer (like 1, 2, 3 …) and one of the displayed internship indexes. If not, the command will be rejected. Refer to the error message displayed for the correct format to use!
| Go to Field Summary | Go to Command Summary | Go to Table of Contents |
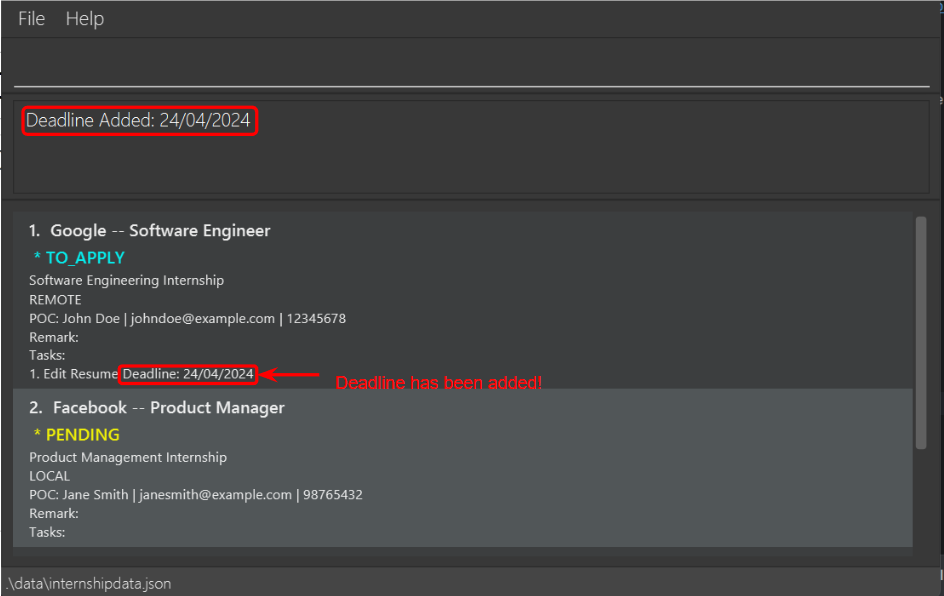
Set Deadline to a Task: setdeadline
Using this function, you can set the deadline to a task under an internship so that you won’t miss the deadline!
Format: setdeadline INDEX /selecttask INDEX /deadline DEADLINE
- The two
INDEXdenote the internship index and task index respectively. -
DEADLINEis the deadline you want to set for the task. It must be in the formatDD/MM/YYYY. The day, month and year fields must be valid (day must be between 1 and 31 inclusive, month must be between 1 and 12 inclusive, year must be a valid 4 digit number)
Before you try this command, you need an internship that has at least 1 task. You can add it by using the addtask command.
1. Input:
setdeadline 1 /selecttask 1 /deadline 24/04/2024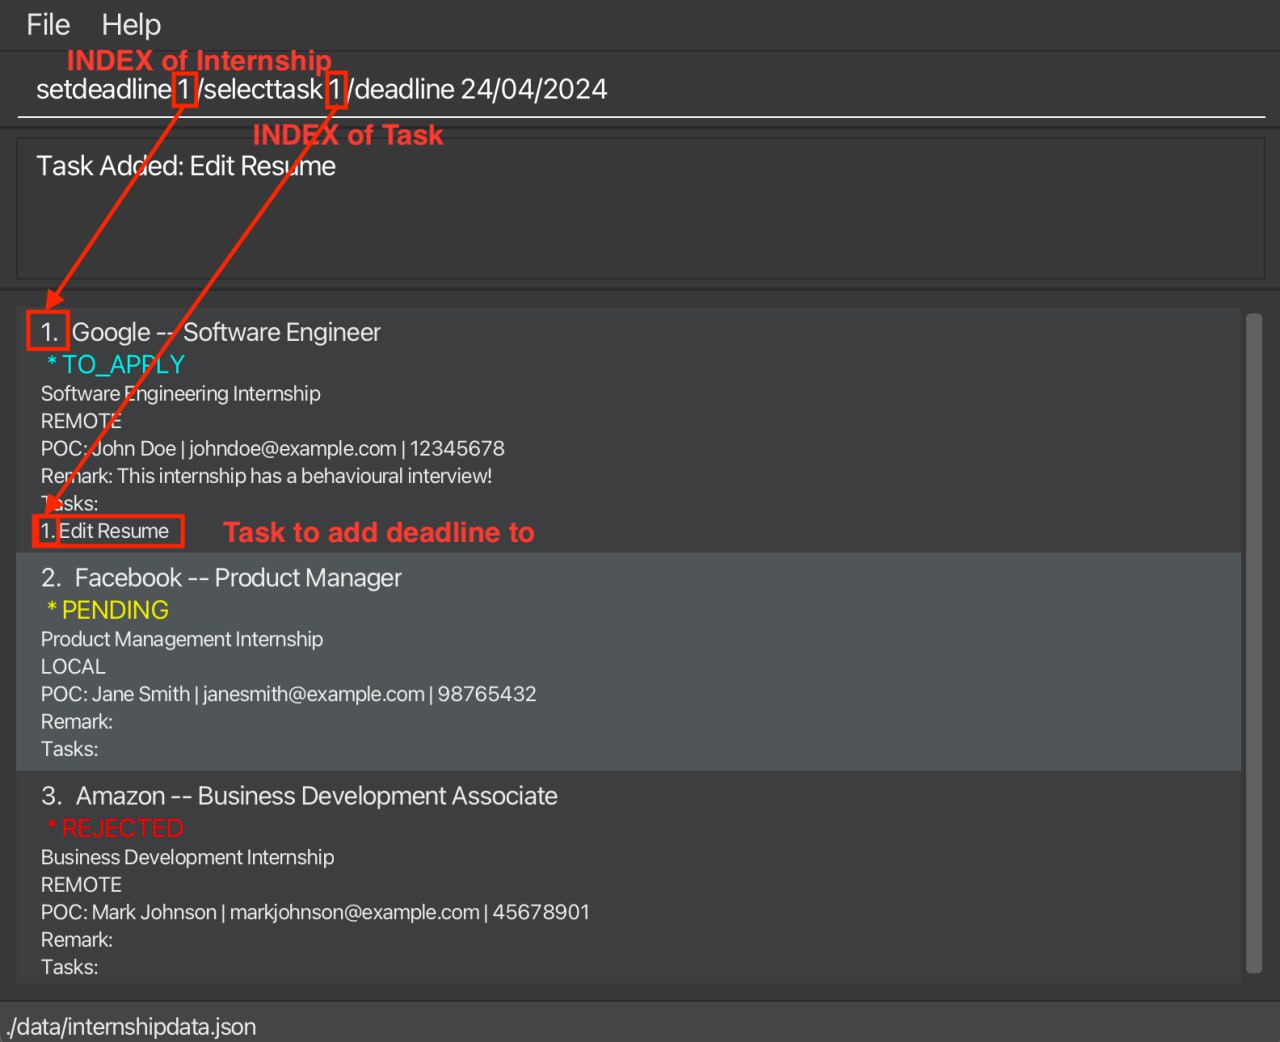
1. Don’t forget that you need to include both the internship index and the task index!
2. If your day or month is single-digit, remember to include a leading zero. For example,
01/04/2024 instead of 1/4/2024.
| Go to Field Summary | Go to Command Summary | Go to Table of Contents |
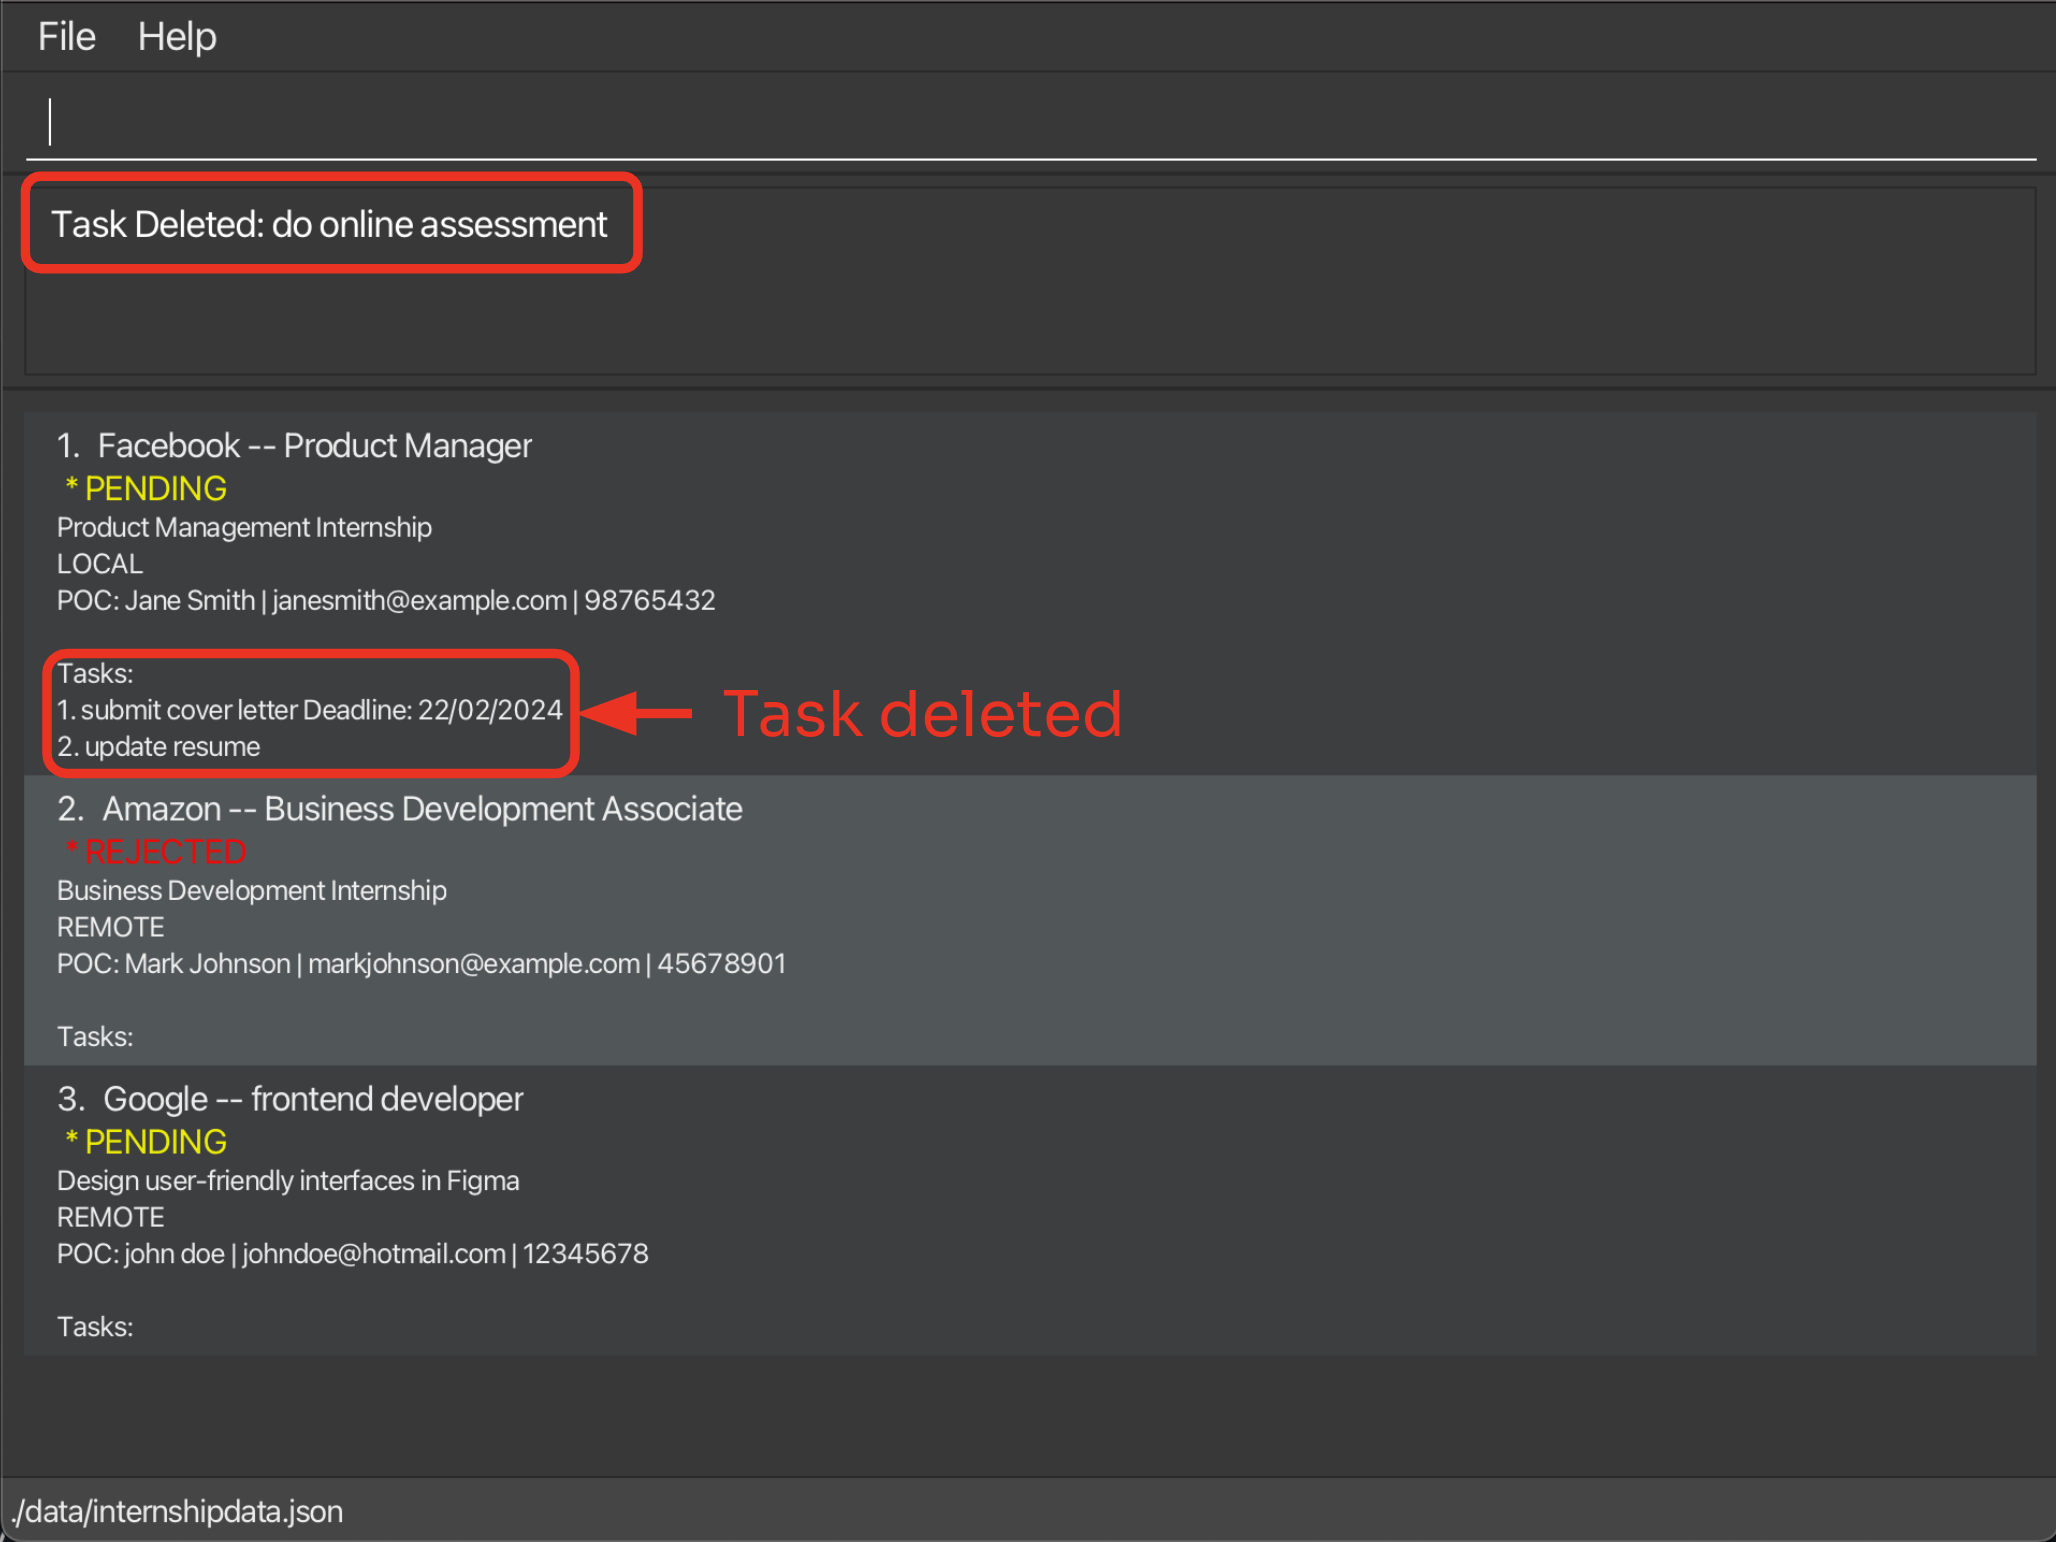
Deleting Tasks from an Internship: deletetask
Lets you delete a task from an existing internship after it is complete!
Format: deletetask INDEX /selecttask INDEX
- The two
INDEXdenote the internship index and task index respectively.
1. Input:
deletetask 1 /selecttask 2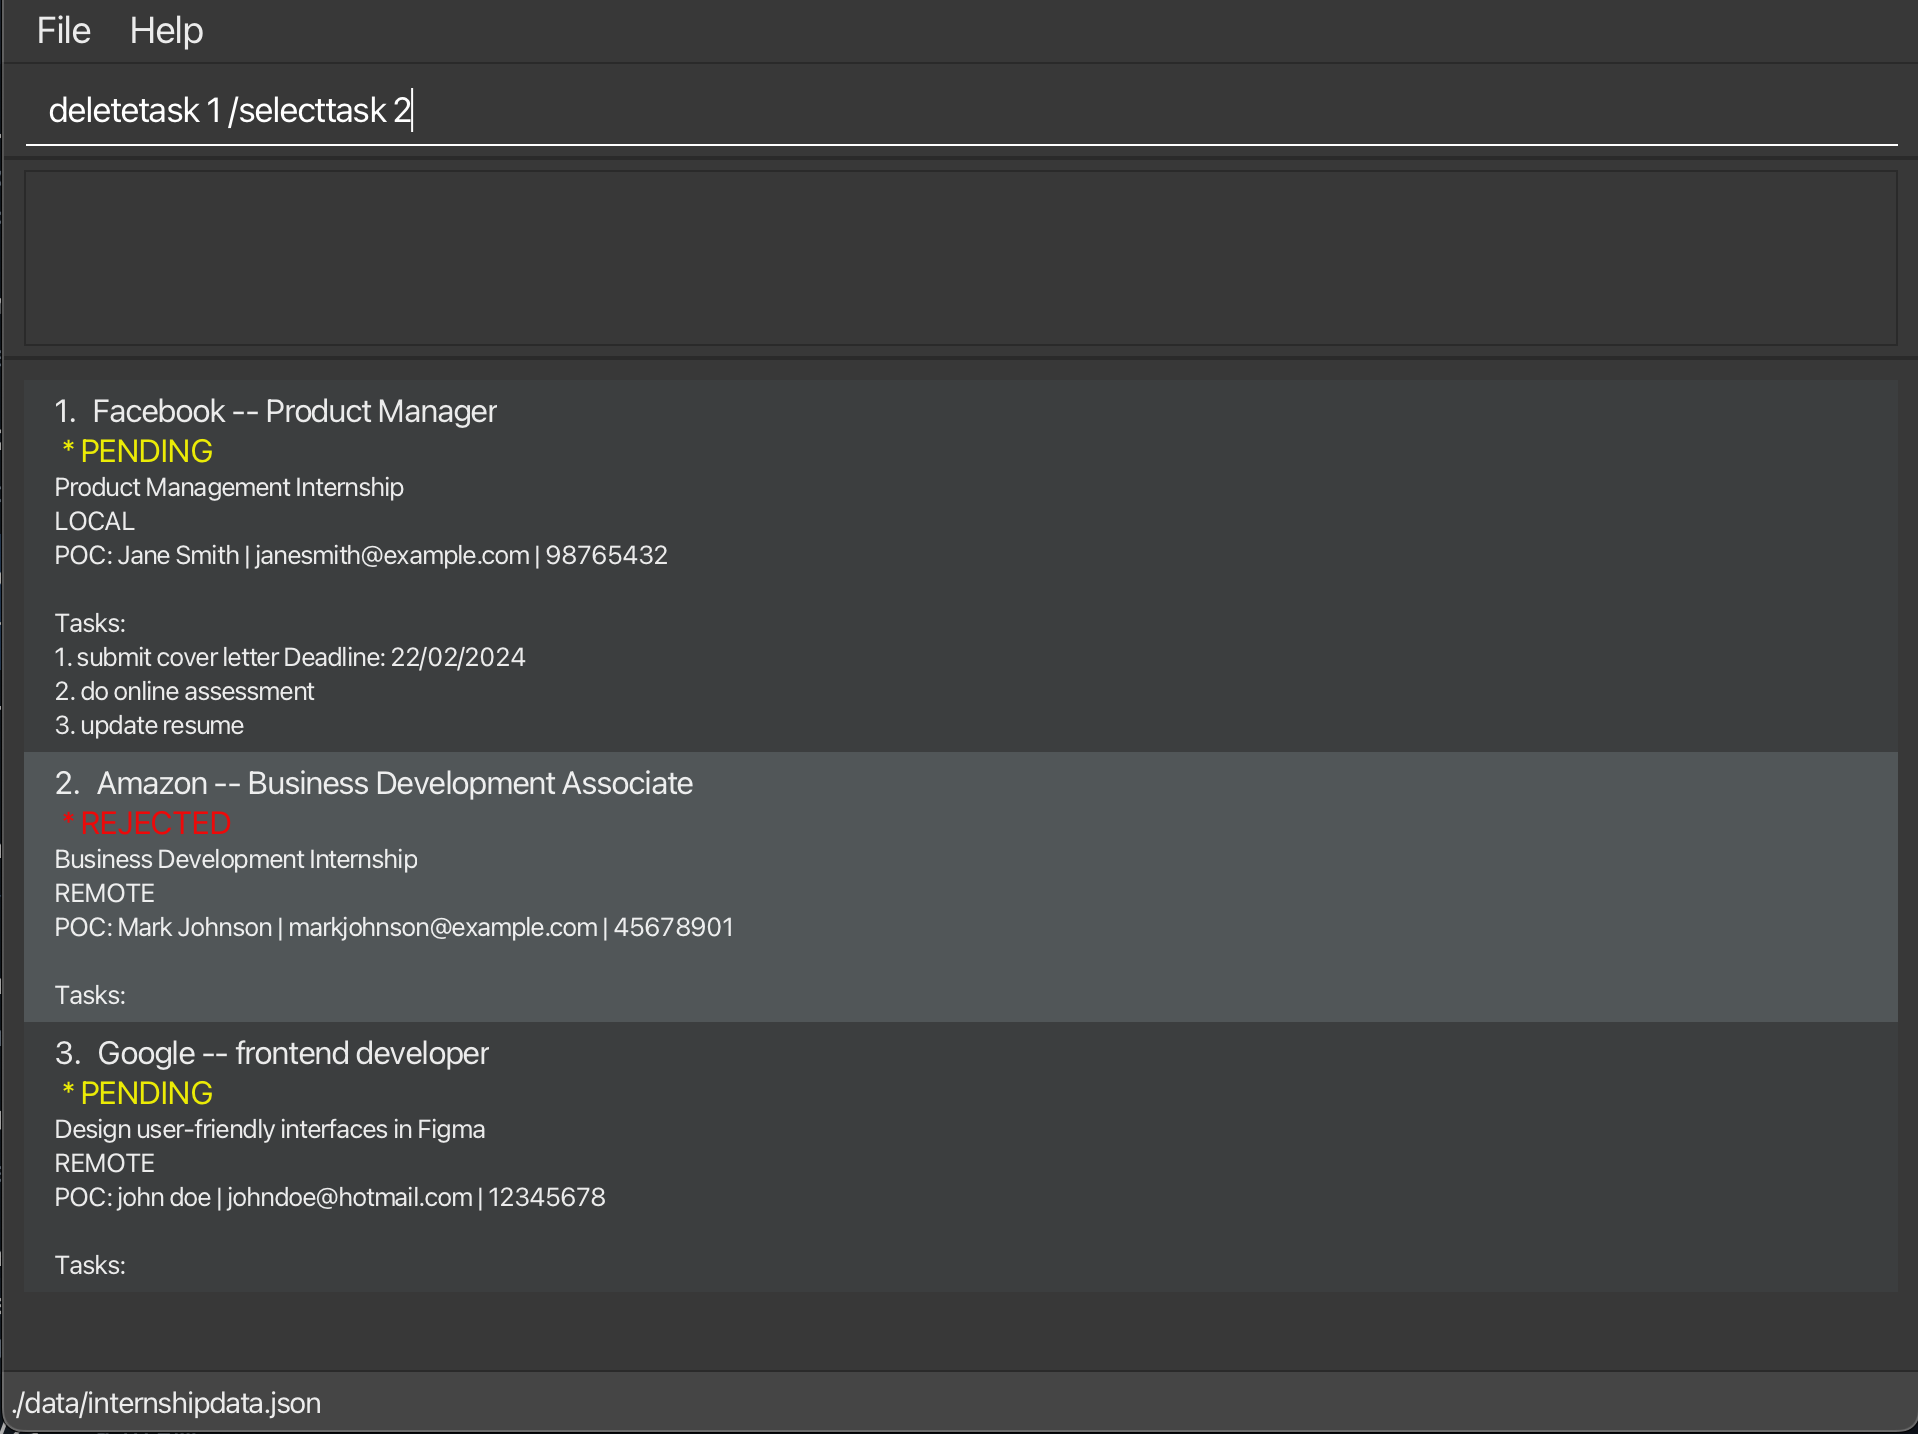
2. Successful Output after deleting task:
| Go to Field Summary | Go to Command Summary | Go to Table of Contents |
Clearing all internships: clear
This clears all your internship entries from CareerSync.
Format: clear
1. Input:
clear2. Successful Output after clearing entries:
There are no more internships in the list.
| Go to Field Summary | Go to Command Summary | Go to Table of Contents |
Exiting the program: exit
When you’re done using CareerSync, you can exit the application using this command.
Format: exit
Saving and Editing Your Internship Data
CareerSync data is saved in the hard disk, as a JSON file at the path
[JAR file location]/data/internshipdata.json. After every command that changes the data, CareerSync performs a save automatically. There is no need to save manually.
Viewing help: help
If you ever get lost or need a refresher on the commands, you can always use the help command to view the help message.
This directs you to the User Guide (this page!), where you can find all the information you need to use CareerSync.

Format: help
| Go to Field Summary | Go to Command Summary | Go to Table of Contents |
Miscellaneous
FAQ
Q: How do I transfer my data to another computer?
A: Do the following steps:
1. Navigate to the folder where CareerSync.jar is stored.
2. Copy your data file from data/internshipdata.json.
3. Install the app in the other computer and overwrite the empty data file (data/internshipdata.json) it creates with the file that contains the data (JSON file) of your previous CareerSync home folder.
Q: How do I reset the data to the default?
A: Do the following steps:
1. Navigate to the folder where CareerSync.jar is stored.
2. Delete the data file from data/internshipdata.json.
3. Restart the app.
Known issues
-
When using multiple screens, if you move the application to a secondary screen, and later switch to using only the primary screen, the GUI will open off-screen.
The solution is to delete thepreferences.jsonfile from the folder where you installed the application. Then, run the application again. -
The deadline field accepts potentially invalid dates as long as the day, month and year are individually valid, including past dates.
The solution is to manually ensure that the dates are valid.
Field Summary
| Field Name | Field Prefix | Description | Valid Inputs |
|---|---|---|---|
COMPANY_NAME |
/com |
Company Name | Any text, numbers, or spaces |
DESCRIPTION |
/desc |
Description of Internship | Any text, numbers, or spaces |
STATUS |
/status |
Status of Application |
to_apply, ongoing, rejected, accepted
|
CONTACT_NAME |
/poc |
Name of Person of Contact | Any text, numbers, or spaces |
CONTACT_EMAIL |
/email |
Email of Person of Contact | Valid format: local-part@domain- The local-part should only contain alphanumeric characters and these special characters: +_.-. It may not start or end with any special characters.- The domain name is made up of domain labels separated by periods. The domain name must: * End with a domain label at least 2 characters long * Have each domain label start and end with alphanumeric characters * Have each domain label consist of alphanumeric characters, separated only by hyphens, if any. |
CONTACT_PHONE |
/phone |
Contact Number of Person of Contact | At least 7 numbers |
LOCATION |
/loc |
Location of Internship |
unknown, remote, local, overseas
|
ROLE |
/role |
Role for the Internship | Any text, numbers, or spaces |
REMARK |
/remark |
Remark for the Internship | Any text, numbers, or spaces |
TASK |
/task |
Task for the Internship | Any text, numbers, or spaces |
DEADLINE |
/deadline |
Deadline for the Task | Valid format: DD/MM/YYYY- The date must be a valid date. |
add or edit command, the /phone parameter does not have a maximum limit for the number of digits. The solution is to manually ensure that the length of the phone numbers you input are correct.